Ok, let's make some flowers!!!! These sweet little blossoms are so versatile. A lovely lady in East Tennessee gave me a flower similar to this many years ago. It was from studying that flower and making a couple of changes that I learned to make these.
You can make them with any fabric that you have and then add any type of button to completely customize it to coordinate with an outfit, a bag, or whatever!!!

You can even attach the button to a covered rubber band to make it a pony tail holder. Oh, this is going to be fun.....let's get started!
 Cut five (5) squares of fabric approximately 2 3/4" x 2 3/4".
 Thread a needle with a long piece of thread and knot both ends together.
Start with one square of fabric.
Fold one corner over to meet the opposite corner....making a triangle.

Take your threaded needle and start in the bottom corner.
Work a large running stitch from that bottom corner up to the next corner, turning the corner and working towards the other corner.

The long edge with the fold will be the only edge not stitched. Another way to look at it is that the raw edges will all be stitched together with the running stitch. If you lay it flat...it should look like the above photo. DO NOT Cut the thread. Instead, gather the fabric down closer to the knot by holding the fabric in one hand and the thread with needle in the other. Gently slide the fabric down towards the knot....you have now made one petal. Four more to go!!

Take your next square and fold it the same way and work a running stitch around both edges.
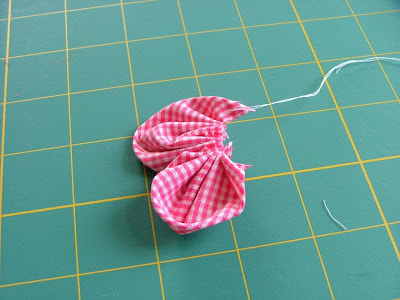
Gently slide the fabric towards the first petal. Now you have two petals.

Take your third square of fabric, fold it and work a running stitch. Three petals made so far!

Take your fourth square, fold it and work the running stitch. I am sure you are getting the hang of this now. And it's becoming fun. This is where the addictive part comes in. Now as you see the flower forming before your eyes...your mind starts working overtime thinking of all the places you could put one of these sweet flowers. But we're not quite done yet....keep up the momentum!

However, you could stop with four petals. It would be a sweet flower. But I generally prefer five petals.

Take your fifth and final square, fold it and work a running stitch.

Take a minute and gaze at this sweet bloom you just made!!!! Then turn it over and take a few tiny stitches to attach the last petal to the first petal near the center area. Tie and knot the thread.

Turn the flower back over and decide what you want to put in the center. This can be fun because different centers can make the flower look completely different.
 For this one I put a mother of pearl button in the center. It has a shank on it so I used the same thread (still attached to the flower....I did not cut it) and sewed the button on.

This green little flower also has a mother of pearl button in it.

I made this flower to go with Elisabeth's smocked sundress that I made her a few weeks back. I put a covered button in the center.

But before I put the button in I attached a covered rubber band to the shank and then threaded it through the center of the fabric flower.

Instant pony tail holder!!!! And the centers can be interchangeable with different covered buttons. I'd love to see what you all come up with as far as these flowers go. The options are really endless. I'll post pictures of your creations if you send them to me!! If you have any questions feel free to ask!!! Let the flower stitching begin!!!
*Check out my post on my favorite lotion here.


