


You can even attach the button to a covered rubber band to make it a pony tail holder. Oh, this is going to be fun.....let's get started!
 Cut five (5) squares of fabric approximately 2 3/4" x 2 3/4".
 Thread a needle with a long piece of thread and knot both ends together.


 Take your threaded needle and start in the bottom corner.
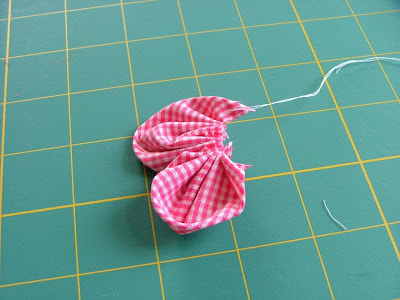
 The long edge with the fold will be the only edge not stitched. Another way to look at it is that the raw edges will all be stitched together with the running stitch. If you lay it flat...it should look like the above photo. DO NOT Cut the thread. Instead, gather the fabric down closer to the knot by holding the fabric in one hand and the thread with needle in the other. Gently slide the fabric down towards the knot....you have now made one petal. Four more to go!!


Take your third square of fabric, fold it and work a running stitch. Three petals made so far!

Take your fourth square, fold it and work the running stitch. I am sure you are getting the hang of this now. And it's becoming fun. This is where the addictive part comes in. Now as you see the flower forming before your eyes...your mind starts working overtime thinking of all the places you could put one of these sweet flowers. But we're not quite done yet....keep up the momentum!

However, you could stop with four petals. It would be a sweet flower. But I generally prefer five petals.

Take your fifth and final square, fold it and work a running stitch.


Turn the flower back over and decide what you want to put in the center. This can be fun because different centers can make the flower look completely different.
 For this one I put a mother of pearl button in the center. It has a shank on it so I used the same thread (still attached to the flower....I did not cut it) and sewed the button on.

This green little flower also has a mother of pearl button in it.

I made this flower to go with Elisabeth's smocked sundress that I made her a few weeks back. I put a covered button in the center.

But before I put the button in I attached a covered rubber band to the shank and then threaded it through the center of the fabric flower.

Instant pony tail holder!!!! And the centers can be interchangeable with different covered buttons. I'd love to see what you all come up with as far as these flowers go. The options are really endless. I'll post pictures of your creations if you send them to me!! If you have any questions feel free to ask!!! Let the flower stitching begin!!!
*Check out my post on my favorite lotion here.


42 comments:
This is great! Thank you so much!
What a really great project. It has so many possibilities and uses. Way to go!
Tamara....thanks. I had fun with it.
Missy....thanks. Yes, I too think the possibilities are endless.
Cute flowers and great tutorial! I wrote a post about your tutorial on my blog, and have linked to the tutorial. http://losthollowcreations.blogspot.com/ Linda
Linda...thanks for the kind words. I admired the flower you made on your blog...it looks great. I'm glad you found the tutorial easy to work through.
Cool! Reminds me of (fabric) yoyos!
Hello Linda, thanks for the great tutorial! I'm going to try it =)
Ana
Cindy, These little flowers are so much fun to make! Thank you for sharing the tutorial. I made 2 for Emily's Easter dress---well, one for her dress and one for her hair. The flower was the perfect touch for an otherwise simple dress.
Great tutorial! I just made a flower and I think these are addictive. :-)
Ruth and Tammy....thanks so much for your kind words!!! I find these flowers mildly addictive too. Kind of like yo-yos. Thanks again!!!
Great flowers, now, I can make it and put it on my daughter dress. Thank you for the tutorial
Farahana...thanks for the nice comments. I do hope you enjoy making the flowers. They are a lot of fun!!!
I found it!! Thank you so much, Cindy!
I had been searching this kind of tutorial so many days already!!
From Jess
http://kidsislands.blogspot.com/
Thanks so much this pattern is awsome. It's easy enough for my daughters and I to do. I just have a problem with fraying sticking out around the button. Any suggestions?
Jess...thanks so much.
Kim...thanks for the kind words. As for fraying....make sure when you are taking the stitches around the two sides of the triangle, that you are taking long stitches. The fewer (longer)stitches you take...the smaller the inner circle will be. Then if you still have a problem..use a larger button for the center. You could also add a few drops of Fray
Check to the inner edges. Hope that helps some!!!
These are so fantastic! We just had to make our own.
http://thecraftyclassroom.com/blog/2009/05/06/sewing-spring-flowers/
I blogged about your tutorial, and put photos of the hairbows we made. You're more then welcome to share the photos.
We did quite a large button, I think next time we'll try a bit smaller.
I'm so happy with the way they turned out, and the fact that my daughter can learn with them!
Thanks for sharing this with us, all the step by step photos really helped!
Blessings,
Valerie
Valerie....thanks for the kind words. I am glad you and your daughter enjoyed making the flowers!!!
thank you soooo much for this tutorial you make it look so easy, that I'll give it a try :)
Thank you lots! I used this on a hat and linked back to you. :)
http://ronandjana.blogspot.com/2009/05/i-swear-by-my-pretty-floral-bonnet.html
Clemencia....thanks so much. I hope you have fun with it and it really is easy and fun to make.
Jana....thanks for the kind words. Your bonnet is adorable. Thanks for sharing it!!
Sooooo cute!! I'll definitely have to try this and create some flower headbands. Thanks for sharing this. :)
thanks so much for this tutorial.finally i can sew flowers now ... I am sewing handbags(if you like visit my blog -www.ririfotiadi.blogspot.com... see my work and give me your comments. thanks again
Dear Cindy,
Your tutorial is gorgeous!!!
Thank you very much!!!
Kind Regards...
Carine
What a great tutorial. Thank you so much!
Great idea!!! Wish I had time to sew some for our craft bazzar. Do I have to get permission to sell them?
Hi Cindy,
I found your blog from Southern Stitches' blog. I too am a Christian. I home schooled my children and I am now a grandma. I got 2 precious granddaughters the past year. So I am again sewing and loving it. I had to check your tutorial on flowers. I want to put one on a hat for each of them. You are a great teacher.
Thanks, Jeannie
This is great!! Theoretically, you can create larger or smaller flowers, as long as the petals are all the same size, right? I would love to make some of these to go along with the dresses I've made for my daughter!
Thanks so much for the tutorial! Your detail explanation along with the pictures made it so easy to make!!! You were right about the addiction...I made 3 already for my daughter! Thanks so much! : )
Thanks so much! Your detail explanation along with the pictures made so easy to make! They turn out so lovely, I want to do more to give to my nieces and small friends! thanks and god bless you! : )
love the motif and pattern. so adorable. Singapore Florist
Thank you for sharing this tutorial. I just love them!
Olá, adorei suas flores de fuxico, muito facéis de fazer. Parabéns!!!
Fica na paz do Senhor Jesus.
Hi - thanks for the tute! I just made them with squares 1 inch by 1 inch and put the flower on a tiny barrette, it is too cute! thanks again!
Olá querida, a paz do Senhor Jesus.Tudo bem? Sua familia é linda. Obrigada pelo recadinho. Apareça sempre que quiser. Bjs... no coração.
Sei bravissima.....grazie
My first attempt at a fabric flower. It's kind of busy because of the crazy violet fabric....I attached a felt sunflower in the center with hot glue and attached an alligator clip on the back. I definitely need some practice, but not too bad considering it was my first try!
https://www.facebook.com/photo.php?fbid=307416422627853&set=pu.233703089999187&type=1&theater
This is so pretty. I'm going to make some for my grand daughters. Love it. Thanks
THANK you so much for sharing your skills and knowledge. I am going to make these bows for headbands for cancer patients. You will get lots of GOD BLESS YOUs!
Thank you again for your generosity.
Hola buenas tardes, te saludo desde Medellín Colombia, super su tutorial, gracias por compartir.
You are so welcome!!! Thank you for taking the time to leave such a kind comment!!! Hope you have a blessed day!!!
Post a Comment